As a professional, your clients probably ask you to design the bathrooms of their dreams pretty frequently. During your first consultation, you should recommend concealed in-wall bathroom plumbing systems to enhance the aesthetics of the space.
Installing a concealed in-wall bathroom plumbing system takes a series of steps and can be done for both new builds and renovation projects.
If you have never worked on a project like this, rest assured that plumbing concealment carriers are as easy to install as standard plumbing fittings. This guide can help you learn what it takes to get the job done. Let's get started!
Key Takeaways:
- You can install in-wall bathroom plumbing systems for your shower, sinks, and toilets. Today, you’ll learn about the steps to installing a toilet unit.
- There are six steps (five if you are working on new construction projects) you will take to install the in-wall system including, removal, preparing and rerouting plumbing, and installing tank, carrier, and finishes.
- Showers and sinks can also operate with concealed plumbing systems. The installation steps are similar to wall-hung toilet installations, with a few slight differences.
Different Types of Concealed Bathroom Plumbing Systems
There are three (possibly four if your client has a separate tub and shower) bathroom plumbing concealment systems. They include:
- Shower/Tub
- Sink
- Toilets
You can also install concealment carriers in other areas of the home, including the laundry room, kitchen, and washrooms. Each system will have its own set of installation steps, and this article covers each of these steps.
For the sake of this publication, let’s focus on toilet concealment plumbing systems for wall-hung units. Later, it will touch briefly on the steps for the other areas in the bathroom.

Running drains and vent lines for a bathroom remodel project may require collaboration with other professional installers, depending on your experience level. Once you and your colleagues complete these bathroom design elements, you can move on to installation.
6 Steps to Install a Concealed Bathroom Plumbing for Your Toilet
According to The Spruce, 90% of bathroom construction is complete when you get to the rough-in stage of the project. At this phase, you are ready to install the in-wall bathroom systems. You must ensure that you get all dimensions correct to make this process a smooth one.
Once you finish with the rough-in, these are the steps you will take for concealed bathroom plumbing installation:
1. Remove the old toilet and tank (for renovations)
If this is a renovation project, you will need to remove the old toilet and tank. You will bypass this step or a new bathroom construction project.
2. Open the floor and wall
You'll then need to open the floor and the wall to expose the plumbing and wall studs. Since you will be re-routing the plumbing and preparing the wall studs in the next step, ensure you remove enough of the wall and floor to see all components.
3. Route or re-route the plumbing
You will now need to prepare the wall to house the in-wall carrier. Make sure to double-check all measurements before making any final cuts.
The carrier will need to be flush with the framing you create with the wall studs.
Routing or re-routing the drain shouldn't be challenging, but you will want to ensure to double-check these measurements as well.
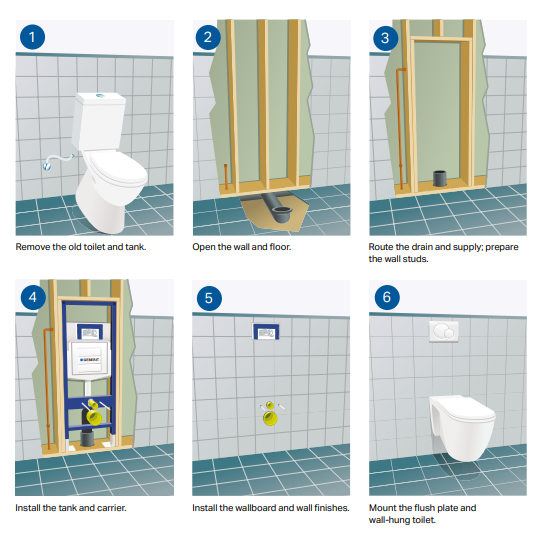
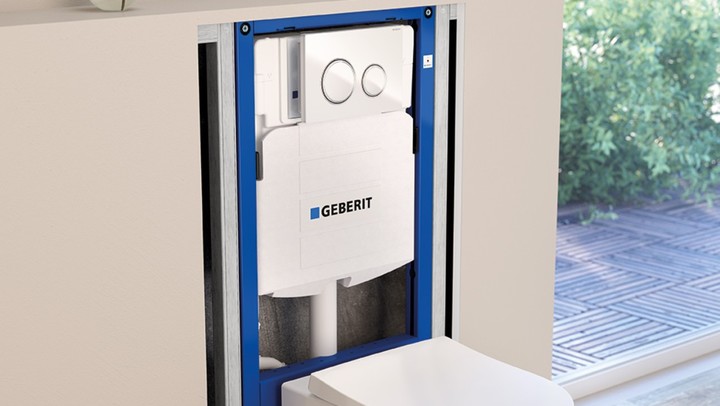
4. Install the tank and in-wall carrier
You will then install the carrier and secure it to the wall studs. Then you will place the toilet tank within the carrier and connect the pipes.
5. Install wallboards and wall finishes
Next, you will close off the wall by installing wallboards, tiles, and other wall finishes. Add toilet mounting hardware and prepare the wall-hung toilet for mounting.
6. Mount the flush plates and wall-hug toilet
The final step is to munt the flush plates and the toilet to the wall. Once you have done so, double-check to ensure that the toilet works and there aren't leaks or other issues.
Steps for Installing Other In-Wall Bathroom Plumbing Systems
Here are the steps for installing a shower and sink in-wall bathroom plumbing:
Showers
Shower concealment systems can be a lot of work, but the results make it worth the effort when designing someone's dream bathroom. In-wall shower systems require concealed valves.
To install them, you will:
- Measure depths: The standard is 75 to 95mm but remember to consider the depths you need for finishes.
- Determine connections: If pipes come in from the side, you will need compression fittings.
- Mark-up an outline: Use a marker to make the necessary outline to determine where each valve and carrier system component will go.
- Cutting and fitting: Fit the pipes and cut them to fit accordingly. Double-check all measurements before making your final cuts and verify the valve fits appropriately.
- Install finishes: Make sure that everything is secure by giving a little tug. Then install the finishes like cover plates.
Sinks
Concealment systems for sinks take slightly less effort than shower systems. However, they too are well worth the work you'll put in to install them. Here are the basic steps to take:
- Remove the former sink (for renovations)
- Expose wall studs
- Install blocking
- Measure and place concealment carrier
- Install shutoff valves and hook up drain
- Add adapters for the P-Trap
- Close the wall
- Install mounting hardware
- Prepare and hang the sink
- Place finishes and supporting fixtures
Know-Hows for Pros: Finding the Best In-Wall Systems
We hope this guide was helpful so you can install in-wall bathroom plumbing systems with ease and peace of mind. Having in-wall bathroom fixtures and fittings improves the bathroom’s aesthetics and makes them easier to keep clean.
At Geberit, we know that tackling a project like this can seem daunting. That is why we make getting what you need easy. It's also why we provide handy tips for the pros. Installing concealed bathroom plumbing
If you are ready to design a dream bathroom with concealed bathroom systems, contact us here to find the latest products.